
Paper Prototyping
»Throwaway Prototype.«
| Number of Participants | Facilitators | Category | Duration | Level of Difficulty |
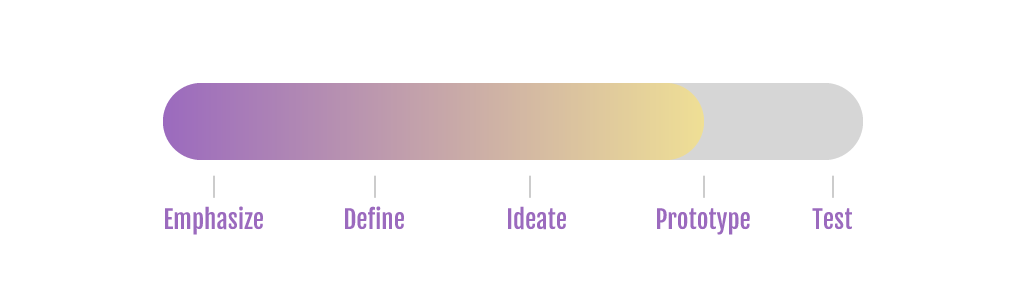
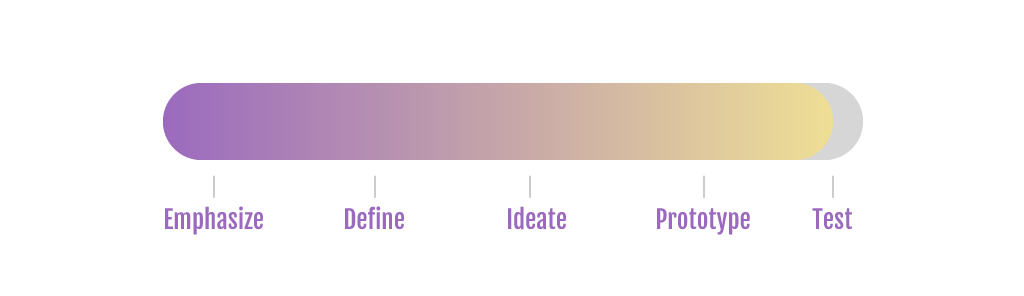
| 4-5 | Observer, Notetaker, User, Human Computer | Prototype & Test Phase | 10-40min | Moderate |
Description
Paper Prototyping is a low fidelity prototyping method used in the user-centered design process. Low fidelity prototypes are generally limited function, limited interaction prototyping efforts. They are constructed to depict concepts, design alternatives, and screen layouts, rather than to model the user interaction with a system. Low-fidelity prototypes demonstrate the general look and perhaps the feel of the interface; they are not intended to show in detail how the application operates.
In the early stages of the Human-centered design process, stakeholders, developers and designers use paper prototyping to share ideas and concepts., To have the ideas depicted gives better and clear understanding. This is a good usability testing technique to test the human interaction with the interfaces, give them a feel of the interface of Products before they are designed or developed. With the participation of a Real User,
Facilitator, Human Computer and Observer. Paper prototyping is often used as the first stages of rapid prototyping. This can easily be done and you don’t have to be an expert to do it. Anyone can do it. This helps you to not get attached to your idea. If you spend a lot of time in designing, it may get hard for you to discard that design idea cause you already got attached to the idea even if it doesn’t meet the requirements. You need to be able to kill your idea. Paper prototypes are easily disgardable. However, paper prototyping is not only associated with sketching and is more than just UI designing. It is a way of creative thinking, out of the box.
Materials
- Paper & Pencil
- Paper correction fludid and tape
- Scissors
- User Interface Stencil
- Cardboard
- Sketch Book
- Markers
- Sticky Notes
- Poster
- Exacto-Knives
- Tape
- Glue
- Transparency Sheets
Preparation
- Gather stationary tools
- No preparation for user needed.
Step-by-Step Instructions
- Setting the goals – What will the prototype achieve. Before starting with anything, have a good idea of what is to be communicated through the design.
- Create tasks rather than drawing out every single frame. Tasks that the user would be able to accomplish.
- The goal is to be quick and cheap. So use pen and paper or any other tools to create the prototype.
- Make one rough sketch per screen without going into the details.
- This needs to be quick, otherwise you can easily get attached to the design. Then it will get harder to get new insight.
- Even though the goal is set, be aware of other factors.
- Act as a human computer to assist the user in completing the tasks without influencing the user.
- Be prepared to iterate, iterate, iterate
- Think of user expectations as the testing will be done with the users
Remarks, Tips, Limitations
- Limited Creativity
- Difficult for Users to Understand
- Extra Step in Prototyping
Strengths: Cost effective with low commitment. Automatic documentation and less learning curve.

Weaknesses: Limited creativity. Might be difficult for users to understand the prototype. Additional step in prototyping.
References
Paper prototype fidelity. (2017). Retrieved 22 June 2020, from https://medium.com/@ergomania_UX/paper-prototype-fidelity-f021d7044bad
Walker, M., Takayama, L., & Landay, J. (2002). High-Fidelity or Low-Fidelity, Paper or Computer? Choosing Attributes when Testing Web Prototypes. Proceedings Of The Human Factors And Ergonomics Society Annual Meeting, 46(5), 661-665. doi: 10.1177/154193120204600513
5 Stages in the Design Thinking Process: https://www.interaction-design.org/literature/article/5-stages-in-the-design-thinking-process
The Magic of Paper Prototyping: https://uxplanet.org/the-magic-of-paper-prototyping-51693eac6bc3
Contributed by Charles Ajiboye & Nusrat Munzarin Methila.

